![Why Are Photos Blurry When Printed? Fix It with AI [2026]](https://xqysaylskffsfwunczbd.supabase.co/storage/v1/object/public/blog-images/2026/02/1772057341637-blog-featured-blurry-print.webp)
Why Are Photos Blurry When Printed?
You picked the best shot. It looks great on your phone. Then you print it—and it comes out soft, pixelated, or just plain blurry. This is one of the most common and frustrating photo problems, and almost nobody tells you why it happens.
The short answer: your photo doesn't have enough pixels for print. The long answer is more interesting—and fixable.
The Resolution Problem (Screen vs. Print)
Screens display images at 72–96 pixels per inch (PPI). Printers need at least 300 dots per inch (DPI) for a sharp result. That means a photo that looks perfectly clear on a screen might only have a third of the pixels needed for print quality.
Here's a quick example:
- A 1080px × 1440px photo looks great on your phone screen
- At 300 DPI, that photo prints sharp at just 3.6" × 4.8"
- Print it at 8" × 10" and the pixels get stretched—creating that blurry, washed-out look
This is why professional photographers shoot in RAW format and export at the highest resolution possible. But most of us don't do that—and old family photos, downloaded images, or screenshots almost never have enough resolution for large prints.
4 Reasons Your Printed Photos Come Out Blurry
1. Low Original Resolution
This is the #1 cause. If your original photo is 800 × 600 pixels, there's simply not enough data to create a sharp 5" × 7" print at 300 DPI. No printer in the world can invent detail that isn't there—unless you use AI.
2. You're Printing Too Large
Even a good photo can print blurry if you stretch it too big. A 12 megapixel phone photo (around 4032 × 3024px) prints beautifully at 8" × 10"—but goes soft at poster size.
3. JPEG Compression Artifacts
JPEG files sacrifice quality for small file sizes. After years of saving, sharing, and re-saving, JPEG compression can destroy fine detail. The blocky artifacts that result look terrible when printed large.
4. Screenshot or Social Media Download
Images downloaded from Facebook, Instagram, or WhatsApp are compressed to tiny dimensions—often as low as 480 × 480 pixels. These look fine on a phone screen but print terribly.
How to Fix Blurry Print Photos with AI
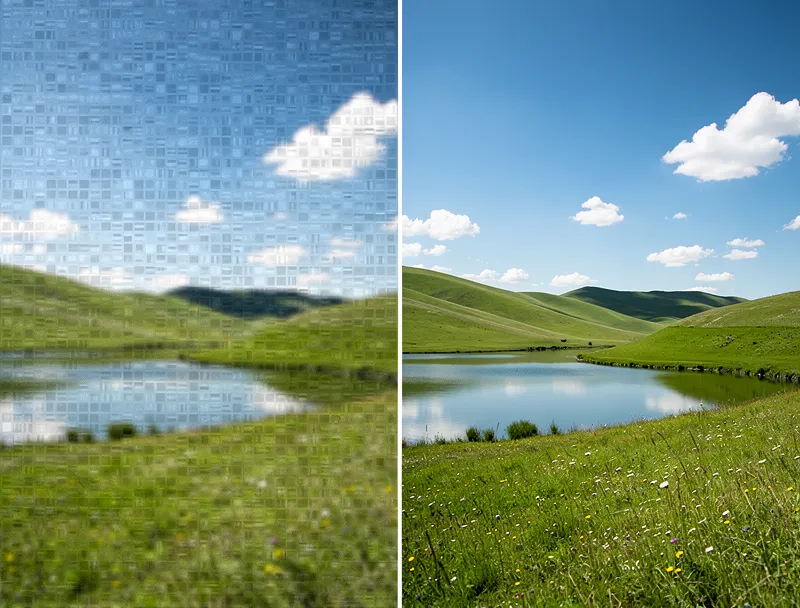
The good news: AI upscaling can genuinely fix this. Unlike old-school resizing (which just copies pixels and makes blur worse), modern AI tools analyze the image and intelligently fill in missing detail.
Try our free AI upscaler to upscale your photos before printing—no account needed.
Here's how to use it:
- Go to myimageupscaler.com
- Upload your photo (JPG, PNG, WebP supported)
- Choose your upscale factor (2×, 4×, or 8×)
- Download the enhanced version
- Print or export at 300 DPI

For a photo you want to print at 8" × 10" at 300 DPI, you need at least 2400 × 3000 pixels. If your original is 600 × 750px, a 4× upscale gets you exactly there.
What Size Do You Need for Your Print?
Use this quick reference to know whether your photo needs upscaling:
| Print Size | Pixels Needed (300 DPI) | Minimum Original for 4× Upscale |
|---|---|---|
| 4" × 6" | 1200 × 1800px | 300 × 450px |
| 5" × 7" | 1500 × 2100px | 375 × 525px |
| 8" × 10" | 2400 × 3000px | 600 × 750px |
| 11" × 14" | 3300 × 4200px | 825 × 1050px |
| 16" × 20" | 4800 × 6000px | 1200 × 1500px |
If your photo is smaller than the "minimum original" column, use our free upscaler to hit the target resolution before printing.
Does AI Upscaling Actually Work for Prints?
Yes—but results vary by how much detail was in the original. Modern AI upscalers like the one at myimageupscaler.com use super-resolution neural networks trained on millions of images. They're remarkably good at:
- Sharpening soft edges
- Recovering detail from compressed JPEGs
- Reducing noise while preserving texture
- Making faces, text, and fine details look natural at large sizes
For photos with some original detail, AI can produce print-quality results from images you'd otherwise throw away. Old family photos from the 1990s, scanned prints, screenshots—all can be rescued.
Other Tips to Avoid Blurry Prints
Shoot in the highest resolution your camera allows. Most modern smartphones default to a compressed format. Check your camera settings for "Pro" or "Original" quality mode.
Skip the screenshot. If someone sends you a photo via text or social media, ask for the original file. Screenshots are almost always lower resolution than the source photo.
Export at 300 DPI before sending to print. If you're editing in Photoshop, Lightroom, or even Google Photos, always export at the highest quality setting.
Use a reputable print lab. Budget print services sometimes downsample your image further before printing. A good lab will print exactly what you send.
Conclusion
Blurry prints come down to one thing: not enough pixels. Whether it's an old family photo, a screenshot, or a downloaded image, the fix is simple—use AI to add the missing detail before you print.
Start upscaling your photos now—it's free, takes under 30 seconds, and you don't need to create an account. Upload your photo, choose your scale, and get a print-ready file in seconds.
Frequently Asked Questions
Quick answers for this guide
Why are photos blurry when printed? fix it with AI []?+
Photos look sharp on screen but blurry when printed? Learn why it happens and how to fix it using AI upscaling. Free tool, no signup required. The practical fix is to identify the source problem first, then use the smallest workflow that addresses it without over-processing the image.
When should I use AI upscaling for this workflow?+
Use AI upscaling when the original image is too small for the target use case but still has enough detail to guide the model. For guides work, pay closest attention to source image quality, upscale settings, output dimensions, and final visual inspection, especially upscale, print, photo.
How do I avoid losing quality after upscaling?+
Upscale once from the best original, avoid repeated compression, keep important text and edges sharp, and export in a format that matches the final use. If the output shows halos, smeared texture, or distorted text, reduce the upscale factor or use a cleaner source image.

Reviewed byJoao Furtado
AI Image Upscaling Specialist
Joao is the founder of MyImageUpscaler and an AI image upscaling specialist. He tests every guide against real upscaling workflows — comparing model outputs, evaluating sharpness and artifact tradeoffs, and validating tool recommendations before publication.
- AI image upscaling
- Model comparison
- Photo restoration
- E-commerce image prep